安装MLflow
pip install mlflow #此命令一键安装启动
mlflow server --host 127.0.0.1 --port 8099    #可自己设置ip,端口,执行后自动启动,或者下面的直接启动命令

mlflow ui   #这是直接启动命令,默认本地的5000端口
启动后可在网页中访问,此时没有模型,需要创作一个
写一个model.py
import mlflow
import mlflow.sklearn
from sklearn.datasets import load_iris
from sklearn.ensemble import RandomForestClassifier
from sklearn.model_selection import train_test_split
from sklearn.metrics import accuracy_score
import pickle

# 设置追踪地址(如果 mlflow ui 在同目录启动,这行可省;远程或指定地址才需要)
mlflow.set_tracking_uri("http://127.0.0.1:8099")

# 设置实验名称(会在 UI 里看到这个分组)
mlflow.set_experiment("iris-rf-experiment")

with mlflow.start_run(run_name="rf_n100_depth3"):
    # ── 1. 记录参数 ──────────────────────────
    n_estimators = 100
    max_depth = 3
    mlflow.log_param("n_estimators", n_estimators)
    mlflow.log_param("max_depth", max_depth)
    mlflow.log_param("model_type", "RandomForestClassifier")

    # ── 2. 加载数据 & 训练 ───────────────────
    iris = load_iris()
    X_train, X_test, y_train, y_test = train_test_split(
        iris.data, iris.target, test_size=0.2, random_state=42
    )

    model = RandomForestClassifier(
        n_estimators=n_estimators,
        max_depth=max_depth,
        random_state=42
    )
    model.fit(X_train, y_train)

    # ── 3. 评估 & 记录指标 ───────────────────
    y_pred = model.predict(X_test)
    accuracy = accuracy_score(y_test, y_pred)
    mlflow.log_metric("accuracy", accuracy)

    # ── 4. 记录模型(MLflow 原生格式)────────
    mlflow.sklearn.log_model(model, "model")

    # ── 5. 同时保存一份 pkl(兼容你之前的 API)─
    with open("rf_iris_model.pkl", "wb") as f:
        pickle.dump(model, f)

    print(f" Run finished. Accuracy={accuracy:.4f}")
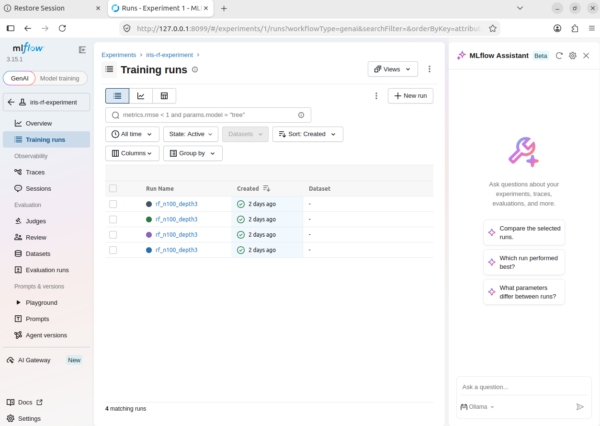
运行这个文件会得到模型,可在网页中查看数据和分析模型
- THE END -

最后修改:2026年10月1日


共有 0 条评论